
Halloween hair is one of those things that looks deceptively simple on Pinterest and then takes three attempts and half a can of hairspray on the actual night. We’ve all been there. You pin a gorgeous braided witch updo in October, pull it up on the 31st, and realize you’ve never actually practiced it, your arms are tired by section three, and you’re already running late.
So this list is built differently. These 19 Halloween hairstyles are organized by difficulty and hair type, not just aesthetics. Some are quick enough to do the night of. Others need a little practice run. A few require bobby pins you probably don’t own yet — but I’ll tell you that upfront.
The overall mood for Halloween hair this year leans into texture. Crimped roots, intentional messiness, undone braids that look like they’ve been through something. The polished Halloween look feels a little dated now. What reads as genuinely spooky or striking is usually something that has movement, depth, and a little chaos to it.
Here’s what actually works — for real hair, on real people.
1. The Classic Witch’s Braid

Long, loose, slightly undone — this isn’t the neat French braid you learned at camp. The witch braid is a three-strand plait with sections pulled apart after the fact, creating a wide, almost tattered look. Start with day-two hair if you have it; it holds texture better than freshly washed strands.
Best for: Straight to wavy hair, medium to thick density. Fine hair can make this work if you use a texturizing spray before braiding and avoid pulling sections too tight — otherwise the finished braid looks deflated by hour two.
Face shapes: Works across the board. The braid draws the eye down and elongates the neck, which is especially good for rounder face shapes.
Difficulty: Low. Takes about 10 minutes once you’ve practiced the pull-apart technique.
Maintenance: None — it’s a one-night style. But bring a couple of extra elastics because the texture comes undone from the bottom first.
Realistic note: If you add dark hair extensions to fake length, make sure they’re clipped in before you braid, not after. Trying to blend extensions into a finished braid is a nightmare.
2. Crimped Vampire Roots
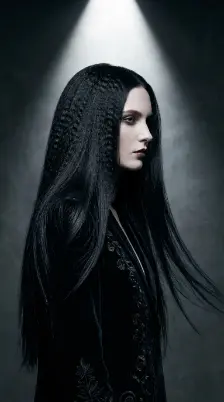
This one’s had a full revival and it looks genuinely good when executed right. The key is crimping only the roots and mid-shaft — not the ends. You want the bottom third of the hair to stay relatively smooth, which creates this strange contrast between structured texture at the top and trailing ends below.
Best for: Medium to thick hair. Very fine hair tends to look overworked with full crimping, but root-only crimping can actually add volume without that problem.
Face shapes: All face shapes. The volume at the roots widens the visual silhouette at the top, so if you have a narrow or long face shape, this is a particularly good choice.
Difficulty: Medium. You need a crimping iron (not a waving wand — the pattern is different), and it takes some practice to know where to stop.
Maintenance for the night: Surprisingly good. Crimped texture holds better than most curls. A light-hold hairspray at the roots and you’re set.
3. Medusa Coil Updo

Think a high bun composed entirely of coiled, spring-like sections that look like they could actually move. For the Medusa version, the coils are intentionally exposed and separated rather than tucked, and you can wind thin sections of braided rope braid into the coils to suggest snakes without the full commitment of wire accessories.
Best for: Naturally curly or coily hair, or heat-styled curls on wavy hair. This updo actually showcases natural curl pattern beautifully.
Difficulty: Medium-high. The coiling and pinning takes patience. Do this one before getting into your costume.
Styling tip: Use a defining cream on damp hair the night before if you’re working with natural curls. It gives the coils more definition and reduces frizz under the pins.
What to know: On very thick hair, the bun can get heavy enough to droop by midnight. A spin pin (the corkscrew-style pin, not a regular bobby pin) at the base of the bun makes a significant difference in hold.
4. Half-Up Spider Web

This is a protective updo at heart — half the hair stays down, and the top section is arranged into a flat, geometric web shape using a rattail comb to separate hair into triangular sections that are pinned flat to the head. Black hairpins or decorative cobweb pins are threaded along the “web lines.”
Best for: Medium-length hair, at least shoulder length. Works on straight and wavy textures. Curly hair needs to be smoothed first at the roots or the geometry gets lost.
Difficulty: Medium. The visual payoff is high for the skill level.
Face shapes: Oval and heart-shaped faces especially. The flat web sits at the crown and top of the head without adding much vertical height.
Accessory tip: The spider web pins from Halloween sections in most drugstores are often cheaply made and bend. Bring a few extra bobby pins to reinforce them.
5. Gothic Rope Braid Crown
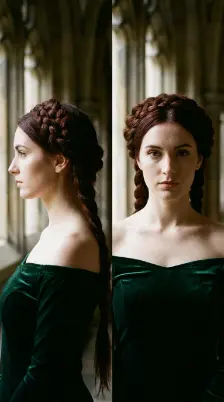
Two rope braids twisted from each side of the hairline, crossed at the back, and pinned into a crown that sits mid-head. It has a medieval feeling that reads as witchy or fantasy royalty depending on what you pair it with.
Best for: Hair that’s at least chin to collarbone length. Works well on wavy and straight hair. On fine hair, you may need to backcomb the braids slightly after they’re pinned to make them look fuller.
Face shapes: Long or oval face shapes especially — the horizontal braid across the crown visually widens the forehead area and balances proportions.
Difficulty: Low-medium. If you can do a rope braid (two sections twisted around each other), you can do this.
One thing: Rope braids have a tendency to untwist from the ends. Seal each braid with a clear elastic at the bottom before pinning, then tuck the elastic under the braid where it’s pinned.
6. Sleek Vampire Widow’s Peak

This is less a hairstyle and more a styling technique — but it’s one of the more effective ones. Hair is pulled straight back into a very slick, very low bun or ponytail, with a deliberate pointed section pulled forward and smoothed down the center of the forehead with gel or pomade to create the classic widow’s peak shape.
Best for: Hair that’s at least ear length (you need enough to pull back), and ideally with a natural hairline that sits low or curved at the center. If you have a naturally high or even hairline, creating the peak takes more product and a finer-tooth comb.
Difficulty: Low on the actual bun or pony. Medium on getting the peak right — it requires patience with the comb and a strong-hold gel.
Product tip: Eco Styler gel (the olive oil version) or Got2b Glued freeze spray give you the clean edges you need without crumbling. Avoid anything labeled “light hold.”
7. Undone Mermaid Waves with Seaweed Braids

This is the Halloween entry point for anyone who already knows how to do beach waves. The base is loose, textured waves — done with a 1.25-inch barrel curling iron, all curled in the same direction, then brushed out. The “seaweed” elements are thin braids pulled randomly from the hairline and mid-sections and left hanging, sometimes with a tiny green or teal hair chalk rubbed along them.
Best for: Medium to long hair, any texture. This is one of the easier styles to adapt for wavy or curly hair — just define your natural texture and add the braids.
Difficulty: Low, if you can do basic waves. The braids are intentionally messy so perfection doesn’t matter.
Note on hair chalk: It’s temporary but it can transfer onto light-colored costumes. Let it dry for about five minutes after application, then dust lightly with a blowdryer.
8. Twisted Banshee Updo

This is a slightly more theatrical take on the messy bun. The hair is gathered into a loose, high ponytail, and instead of tucking everything into a neat bun, sections are twisted, looped, and pinned outward so the updo looks almost like it’s exploding. Ghost-white baby hair can be set with light gel at the edges for added effect.
Best for: Thick or voluminous hair. Fine hair won’t have enough mass to make the extended sections look full — but adding clip-in pieces to the ponytail before building the updo fixes this.
Face shapes: Works especially well for square and round faces because the vertical height of the twisted updo draws the eye up.
Difficulty: Medium. Easier than it looks. The key is not overthinking the placement of sections.
9. Braided Skull Base Bun

The braid pattern at the base mimics the look of a decorative skull — two small braids that cross below a centered bun. It’s subtle enough that it reads more as an intricate hairstyle than a Halloween reference, which makes it wearable for events where you want to be put-together but still in the spirit.
Best for: All hair types. Thicker hair creates more visible braid ridges.
Difficulty: Medium. Easier if you have someone helping with the back.
Salon alternative: If braiding isn’t your skill set, this is a genuinely good style to bring to a salon as a reference image. Most stylists can execute it in 20 minutes.
10. The Coven Parted Bob (Blunt, Center-Parted)

For shorter hair. A blunt bob with a perfectly centered part, blown out smooth, or straightened flat. The severity of the center part and the blunt ends read as quietly threatening — which is a very effective Halloween vibe. You don’t need to add anything else. Maybe a black headband with thin horns, but the haircut does most of the work.
Best for: Bob-length hair (chin to collarbone). Works on most textures with the right blowout.
Difficulty: Low if you already have a bob. High if you’re considering cutting one for Halloween.
Realistic note: This is not a good Halloween haircut to DIY if you haven’t cut your hair before. And no, you don’t need to cut a blunt bob to achieve this look — a temporary straightening and a very precise center part with gel achieves the same visual.
11. Frankenstein’s Bolt Updo

A very high, very vertical updo — essentially a tall French twist or a beehive — with two small sections left out at the temples, rolled flat, and secured horizontally with hair jewelry that resembles bolts. The look is cartoonishly recognizable and genuinely fun.
Best for: Medium to long hair. Fine hair works here because the beehive shape is built with teasing and product rather than natural density.
Difficulty: Medium. The French twist itself takes practice, but there are versions of this done with a high ponytail and fabric donut bun that are much more beginner-friendly.
Teasing note: Use a tail comb for backcombing, not a brush. And use hairspray during the teasing process, not just at the end — layer the hold as you go.
12. Dark Fairytale Fishtail

A loose fishtail braid done on one side, with small sections deliberately pulled out at irregular intervals. It can be finished with a few small pins featuring black stars or crescent moons, or left plain and let the texture do the work.
Best for: Medium to long hair, straight to wavy. On curly hair, this style works if the hair is stretched first with a brush blowout; unmanaged curly hair makes the fishtail sections hard to distinguish.
Difficulty: Medium. Fishtail braids are slow but not technically complex.
Hair length reality: A true fishtail braid requires at least shoulder length to look full once the sections are pulled apart. Shorter than that and you end up with a very small braid that’s underwhelming.
13. Silver Moon Goddess Waves

Long, very loose waves — almost more like an S-shape than a curl — with a braided or twisted crown piece across the top of the head. The name comes from the styling: keeping the waves very soft and wide, which gives a slightly ethereal quality, especially if paired with silver hair chalk or temporary shimmer spray at the roots.
Best for: Longer hair. Very fine hair can achieve this but needs extra product and careful not to brush the waves out too aggressively.
Difficulty: Low. Wide-barrel iron (1.5 to 2 inches), wrap the hair loosely, and don’t clamp too hard.
Shimmer spray note: Go lighter than you think you need. Shimmer products photograph beautifully but can look overdone in person. One pass is usually enough.
14. Wicked Witch Double Bun

Two buns, one on each side, positioned high on the head. The placement and the fact that both buns are smooth and tight gives it a deliberately geometric quality — less playful space buns, more structured and intentional. A few pieces left out around the face in a curved, claw-like shape add to the effect.
Best for: Medium to long hair. Thick hair especially — the buns need mass.
Difficulty: Low. Probably the most beginner-accessible style on this list.
Fine hair note: Donut bun accessories (fabric rings you wrap hair around) are your best friend here if you don’t have much density. They make even thin buns look full.
15. Haunted Halo Braid

A full halo braid — the kind that goes all the way around the head in a single loop — done in a visible, open-stitch style so the sections read clearly. Not tight, not neat. The looseness is intentional.
Best for: Hair with at least medium density. This braid is most difficult for fine hair to maintain because the sections can thin out and separate with gravity throughout the night.
Difficulty: Medium-high. The full halo is more technically demanding than a half halo or crown braid. If you’ve never done one, practice once or twice before the 31st.
Tip: Braid around the head moving from front to back in the direction your hair naturally falls. Fighting against your hair’s natural weight makes this braid much harder to control.
16. Poison Ivy Twisted Low Ponytail

A low ponytail where the sections are twisted rather than smoothed before being gathered, so the ponytail itself has a coil to it. Green hair chalk or a temporary green color spray (sprayed at the roots and mid-length, not the tips) creates the botanical effect without commitment.
Best for: Any hair length that reaches a ponytail. Works on all textures.
Difficulty: Low. The twist-before-gathering technique adds maybe three minutes.
Color spray note: Temporary color sprays vary wildly in quality. The ones at costume shops tend to dry crunchy and leave residue. Look for the style-specific brands (Color Wow, L’Oréal temporary color spray) from a beauty supply instead.
17. Dead Doll Pigtails

Two low to mid-height pigtails, styled straight and smooth, with the hair sections pulled into a slightly pouf-y dome shape at the top of each. Hair ribbon — ideally black or deep red, wide satin — tied in a large bow at each base. The very neat, very stiff quality of the styling is what makes it read as “doll” rather than simply “pigtails.”
Best for: Shoulder to mid-length hair. Layered hair can make the dome shape harder to control — you may need additional pins.
Difficulty: Low-medium. The dome shape (created by slightly backcombing the section before gathering it) is the one technical step.
18. Smoke and Embers Textured Updo
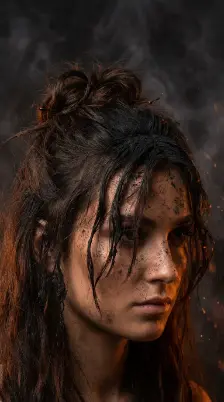
This one leans abstract. The base is a messy half-updo, but sections from the crown are pulled forward and left loose around the face at unusual angles — almost like they’ve been disturbed. Dark hair works best for this as a base; a light dusting of black hair shadow (yes, that’s a product) at the roots adds a sooty quality that works well with fire or smoke-based costumes.
Best for: Medium to long hair, any texture. The messiness means imperfect texture reads as intentional.
Difficulty: Low. The less precise, the better.
Black hair shadow note: This is essentially the same technology as eyeshadow, applied to the scalp and roots with a brush. It brushes out completely. Don’t use it near your hairline if you’re wearing white or light colors on your face — it transfers.
19. Blood Moon Sleek High Pony

A very long, very smooth, pulled-back ponytail — as high on the head as it can go without looking uncomfortable. The ponytail itself is straightened and left heavy. A small section from the ponytail is wrapped around the base to conceal the elastic. The drama is entirely in the silhouette: the cleanness of the pulled-back hair and the weight of the ponytail swinging.
Best for: Long hair. Works on straight, wavy, and heat-styled curls.
Difficulty: Low, technically. Getting the ponytail to sit perfectly high and stay there throughout the night is the actual challenge.
Tip: Position the ponytail, secure it with one elastic, then use a second elastic just below the first. The double-elastic hold prevents the downward droop that happens with single elastics on heavy ponytails.
Styling & Maintenance Advice
Most of these styles depend on second-day hair or hair that’s been prepped with texture. Freshly washed, fully conditioned hair is slippery — braids loosen faster, buns droop, and twisted styles unwind. If you’re doing your Halloween hair the morning of, use a dry shampoo or texturizing spray at the roots after drying.
Heat tools are involved in about half of this list. A crimping iron, wide-barrel curling iron, and flat iron cover most scenarios. Don’t buy cheap irons for Halloween if you can help it — inconsistent heat causes uneven texture that doesn’t blend well. Borrow one if you need to.
For updos that need to last all night: the number of pins matters less than the placement. One well-placed spin pin holds more than five regular bobby pins placed at random. Invest in a pack of spin pins if you don’t have them.
Frizz is the quiet enemy of Halloween hair because you’re often in and out of different temperatures — outdoor events, indoor parties, potential rain. A small amount of anti-frizz serum on the surface of any style before you leave helps. Don’t use too much or it weights the hair down.
What to Ask Your Stylist
If you want a Halloween-adjacent haircut (blunt bob, defined layers for better braid texture), there are a few things worth communicating clearly:
For the blunt bob: “I want the ends to sit heavy — please don’t point-cut the tips or add graduation at the back.” This preserves the blunt visual weight that makes the style look intentional.
For better braid texture: “I want soft internal layering that adds movement but doesn’t remove so much weight that I lose braid thickness.” Aggressive face-framing layers or too many short layers at the crown can make braids look thin and wispy after a few weeks of growth.
For any style with volume at the roots: “Can we focus the layers on the mid-length and ends rather than the roots?” Root layers can look great when the hair is freshly styled but can become hard to manage as they grow out.
Common Mistakes
Using the wrong products for the style. Light-hold products on styles that need structure means everything falls out by 9pm. Match the hold level of your product to the complexity of the style.
Skipping the practice run. The Medusa updo, the halo braid, the skull base bun — all of these look achievable until you’re doing them alone in a mirror for the first time on Halloween night. Do it once beforehand, even roughly.
Over-pinning. Adding pins doesn’t add security if they’re placed in the wrong direction. Bobby pins hold best when they slide in against the direction of the hair’s pull — open side down for most updos.
Starting with freshly washed hair. Already mentioned above, but worth repeating because it’s genuinely the most common Halloween hair mistake.
Adding too many accessories. Pick one focal point — a crown braid, a dramatic updo, or a decorative pin — not all three. The Halloween styles that read as polished usually have one strong element, not four competing ones.
FAQ
Can I do Halloween hairstyles on short hair?
Yes — the Coven Bob, Vampire Widow’s Peak, and the Wicked Witch Double Buns (if your hair reaches a pony) all work on shorter hair. The Wicked Witch buns technically work on very short hair too if you add clip-in extensions to the ponytail bases first.
How do I make Halloween hairstyles last all night?
Hold-level products matched to the style, double-elastic methods for ponytails, spin pins for updos, and a travel-size hairspray in your bag for touch-ups. Heat-styled elements hold better if you let each section cool completely before releasing it from the iron.
Will temporary hair color damage my hair?
Sprays and chalks, used correctly, don’t damage hair. The ones to be cautious with are the drugstore spray cans — some formulas are drying and can cause breakage on fine or chemically processed hair if left in too long. The better quality brands (aimed at the beauty market, not just the costume market) are generally gentler.
What’s the easiest Halloween hairstyle I can do myself?
The Double Bun, the Witch’s Braid, or the Blood Moon Sleek High Pony. All three require minimal tools and minimal technique.
How do I add Halloween elements to a style I already know how to do?
Product and accessories. Hair chalk changes color. Decorative pins change the focal point. A few small braids pulled out from a style you already know how to do adds complexity without rebuilding from scratch. Work with the skills you have and add one element rather than attempting an entirely new technique.
Do I need heat tools for Halloween hairstyles?
For about half of these, yes. The other half — the braided styles, the updo variations, the ponytails — work on your natural texture with product alone.
Final Thoughts
Halloween is one of the few occasions where “messy” and “intentional” mean the same thing, which actually makes this easier than styling for most events. The main thing is matching the style to your actual hair — not the hair in the reference photo — and giving yourself one practice run for anything that involves braiding around the head or building an updo you’ve never done before.
The styles here range from ten-minute fixes to forty-minute projects. Most are somewhere in the middle. None of them require a professional unless you want one.

